Git:
A Starter Guide
Git is a free and open-source version control system that tracks changes in a file system by supporting data integrity for multiple parallel workflows on different computers. It is used for Source Control Management (SCM), where changes can be monitored and managed over time. Some git repository services include GitHub, GitLab, and BitBucket.
Developers have a local copy of the repository's development history. Changes are imported as branches are merged and all changes are reflected in all linked repositories. This distributed development workflow supports non-linear development with rapid branching and merging as various users access the data.
Installation
- Install Git for your operating system from git-scm
- If Git is already installed in your machine, you can update to the latest version with the following command:
|
git
clone https://github.com/git/git |
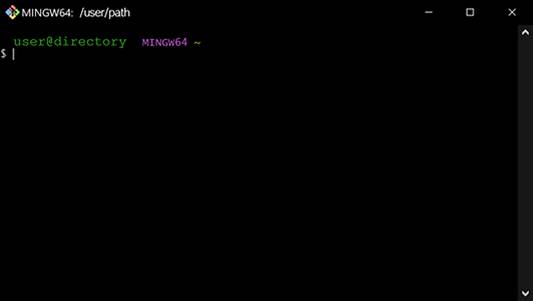
Launch
- Open the Git Bash application on your desktop
- This will launch a terminal window where git commands are input
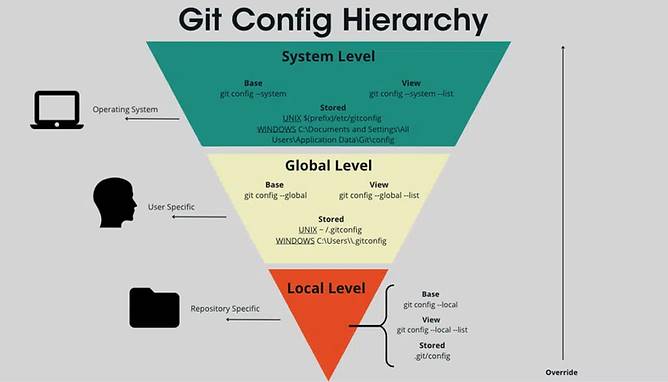
Configure Your Git Profile
- Git Configuration Hierarchy (Levels):
- system: Settings to every user on the system and all their repositories
- global: Settings to a user’s profile and all the repositories they interact with
- local: Settings to a specific repository
- Configure your git user profile with the following commands in your git bash terminal:
|
git config --<git_configuration_level> <configuration_key> "<configuration_key_value>" ... |
…
|
git config --global user.name "<your_name>" |
|
git
config --global user.email
"<your_email>" |
|
git
config --global init.defaultBranch
<default_branch_name> |
- Get git configurations help with the following command:
|
git
help config |
- See all git configurations with the following command:
|
git
config -h |
- Remove a global configuration variable with the following command:
|
git
config --<git_configuration_level> --unset
<configuration_key> |
Setting Up Your Local Repository
- Navigate to a location on your local drive to store your local repository
- Two ways to navigate:
- Execute the following command in your git bash terminal:
|
cd
<local_repo_file_path> |
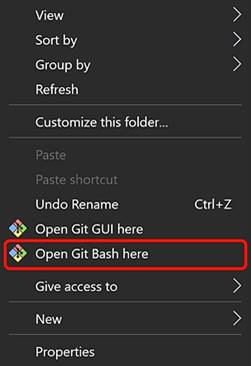
- Navigate to the directory, right click, select "Open Git Bash Here"
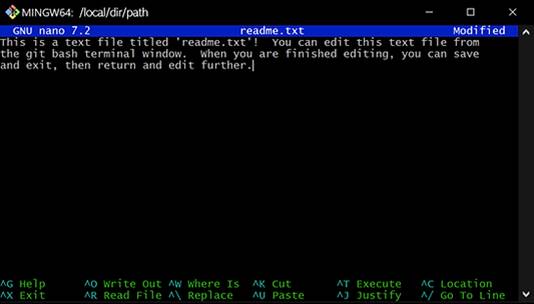
- Create a file in your intended repository directory through your git bash terminal
- The following command in your git bash terminal to creates a .txt file titled 'readme'
|
nano
readme.txt |
- You will land in a new git bash terminal window where you can edit the file's text
- Follow the command prompts at the bottom of the window to save and exit the editor, returning you to your git bash terminal commands window
- NOTE: '^' means 'ctrl'
Initialize Your Local Repository as a Git Repository
- Initialize the selected directory as a git repository with the following command:
|
git init |
- 'init' command creates a hidden directory containing hidden files with important program configuration information
- NOTE: These files should not be changed manually
- Git stores information about the project as a special .git sub-directory
- NOTE: Deleting these files will erase the project's history
Local Repository Contents:
- The following command checks the current working directory:
- The following command lists visible contents in your current directory:
|
ls |
- The following command lists visible and hidden contents in your current directory:
|
ls
-a or ls -la |
- Files beginning with a dot (.) are hidden files usually containing important program configuration information created when the repository was initiated
- NOTE: NEVER try to edit or delete these hidden files because the entire project depends on them
Terminology
- Add: Adds changes to the working directory/repository to a staging area. These changes are not applied to existing files until a 'commit' is performed. These can be viewed as pending changes.
- Commit: Captures a snapshot of a project's currently staged changes. This tells the repository to record and track all changes made to the file. At its core, a repository is a collection of commits.
- Untracked File: Files in a repository that are not being tracked by git.
- Tracked File: Files in a repository that are being tracked by git.
- Staged File: Files in a repository that are being tracked by git, but currently contain changes have not been committed yet.
List Files in Working Directory for Commit
- The following command:
- Defines the current repository branch (master)
- Lists commits
- Lists which files are staged, un-staged, and untracked
|
git
status |
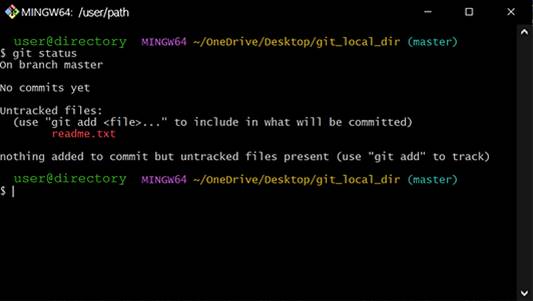
- The 'readme.txt' file that was in the working directory prior to initiating it as a git repository is identified as an untracked file
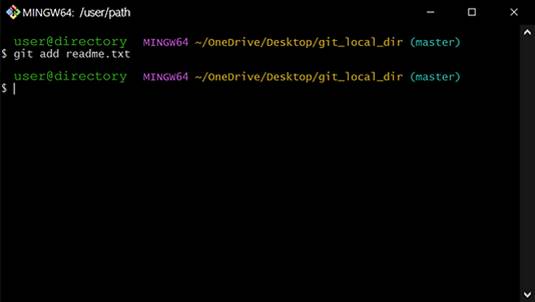
Add File to Repository
- Add (stage) a specific file to staging to be tracked by git with the following command:
- Add (stage) all changed files in the repository to staging to be tracked by git with the following command:
|
git
add -A or git add
--all |
- Add (stage) all changed files in the current working directory to staging to be tracked by git with the following command:
|
git
add . |
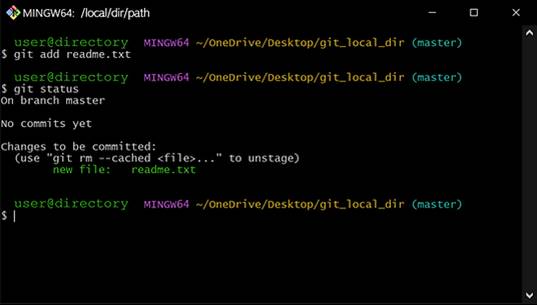
- Check the repository status with the following command:
|
git
status |
- 'readme.txt' is now being tracked by the repo and ready to committed
- If a file in staging is not ready to be committed with the next commit instance, move it back to the workspace with the following command:
|
git restore --staged <file_name> |
Rename Files in Repository
- Files in the directory can be renamed with the following command:
|
git
mv "<old_file_name>" "<new_file_name>" |
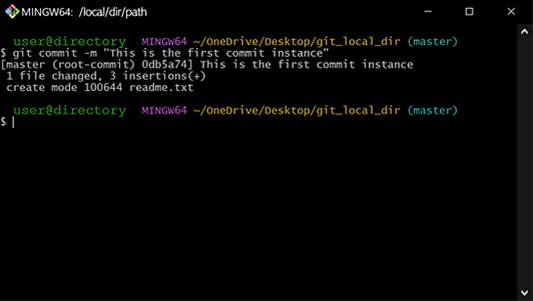
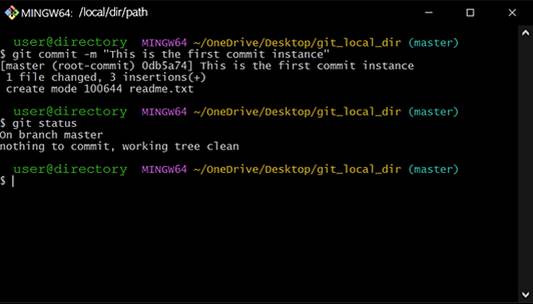
Commit Changes to File(s) in Repository
- Commit staged changes with the following command:
|
git commit -m "<meaningful_message_about_committed_change>" |
- The text after the message, '-m', flag in the command is an optional (but encouraged) message or note about the commit instance.
- Commit all stage files that were changed or deleted directly from the workspace with the following command:
|
git
commit -a |
NOTE: This will not work with files that have not previously been added
- Modify the message associated with the most recent commit instance:
|
git commit -m "<meaningful_message_about_committed_change>" --amend |
- Confirm that the staged changes were successfully committed and the repository is up to date (Repository should be left in this state prior to moving on to other tasks):
|
git
status |
- NOTE: Commits to public branches should only be done with the entire codebase is in a functioning state. This is important to avoid revisiting 'broken' code if a previous version of code is revisited in the future. Private branches should be labeled as such and can be treated as a sandbox environment where a developer can commit as frequently as they choose.
- More on public and private branches below
Track Commit History
- View all commit history:
or
|
git reflog |
Exit terminal command with ‘q’
- View all commit history, abbreviated:
|
git
log --oneline |
Exit terminal command with ‘q’
- View all commit history, detailed:
|
git
log -p |
Exit terminal
command with ‘q’
- View all commit history in a tree format, detailed:
Exit terminal command with ‘q’
or
|
git
log --all --graph --decorate --oneline |
Exit terminal command with ‘q’
- View all commit history from a specific developer (Does not have to be the full name):
|
git log --author="<developer_name>" |
Exit terminal command with ‘q’
- Search commit history for a specific instance by commit message:
|
git
log -S "<commit_message_to_search_by>" |
Exit terminal command with ‘q’
Return to a Previous Commit Instance
- Return the repository to a previous commit with the following command:
|
git reset <commit_tag> |
Commit tags are the yellow string of characters to the left of a commit instance in the git logs
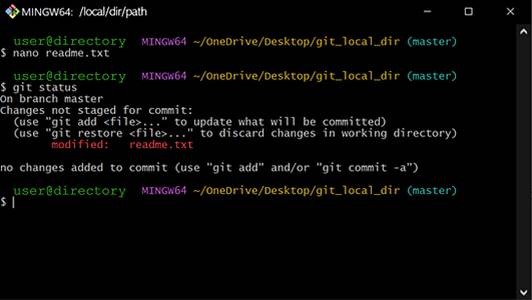
Tracking Changes to Repository Files
- Suppose we opened the 'readme.txt' file, modified its contents, and saved it. The repository identifies the file as modified, so the changes are tracked but not recorded.
|
git
status |
- The file 'readme.txt' has been modified. See exactly how the modified file differs from the most recently committed version of the file with the following command:
|
git
diff |
- Original content will be red and modified content will be green
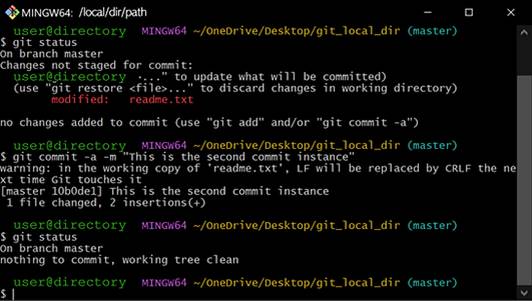
- Add the modified 'readme.txt' file to the staged files and commit. This time use the -a flag to push the modified file directly from the workspace to a committed state, then check the repository status:
|
git
commit -a -m “<meaningful_message_about_committed_change>” |
|
git
status |
Ignoring Files in the Repository
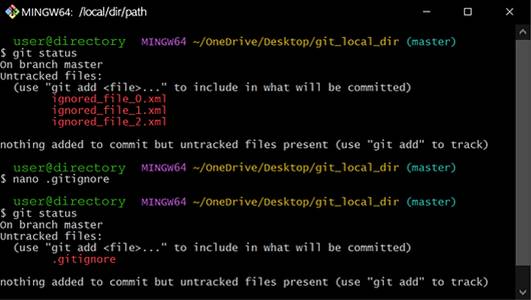
- Suppose a set of files of a specific type exist in your local directory that you don't want to track in your git repository. Doing so would waste disk space.
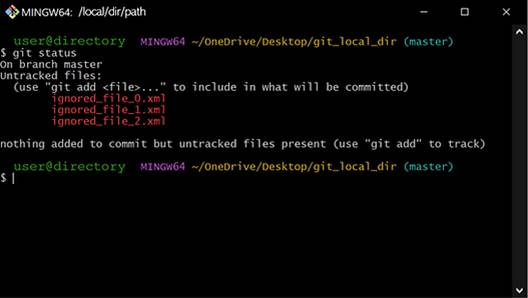
- Execute the following command to prompt git to ignore tracking certain files:
|
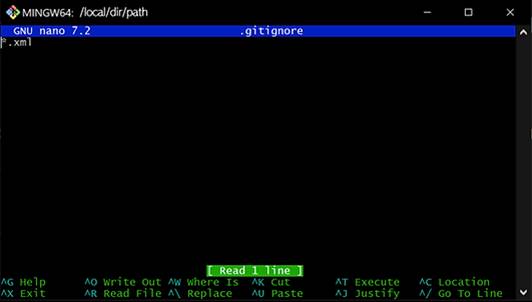
nano .gitignore |
- The following prompt window will appear where you can type '*.xml', then '^E' to exit, 'Y' to save, and <enter> to confirm and return to the terminal command window.
- The syntax below tells git to ignore all (*) files with the .xml file extension
- Indicate specific files to ignore as <file_name>.<file_extension>
- The repository's status doesn't identify the indicated ignored files as 'untracked' anymore, but your new '.gitignore' file is.
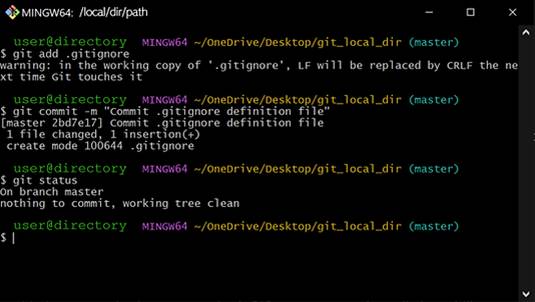
- Add and commit the '.gitignore' file to your repository for tracking. While this file is tracked, your indicated files to ignore will not be.
Deleting Repository Files
- Files can be deleted directly from your repository manually
- After manually deleting a file from your repository, a repository status check will list files deleted locally in red typeface.
- Commit the changes (i.e. deleted files) with git commit -a, and a commit message will be required
- NOTE: Not entering a commit message will abort the commit instance.
Alternatively,
- Files can be deleted from your current working directory through the git bash terminal by file name or in bulk by file extension with the following commands:
|
git
rm <file_name_to_delete>.<file_extension> or git rm *.<file_extension> |
- Commit file deletion:
|
git
commit -m "<meaningful_commit_message_about_deletion>" |
- Deleted files can be restored, depending on when the deletion occurred. One way of restoring a recently deleted file is with the following command:
|
git restore <file_name> |
Repository Branches
- Check the currently active branch with the following command:
- Branches can be added to a directory with the following command:
|
git
branch <new_branch_name> |
- Navigate to ("checkout") a different repository branch with the following command:
|
git switch <branch_name> |
Or
|
git
checkout <branch_name> |
o Switching into the new branch will be reflected in the repository's local directory, meaning that the repository will report on the directory's current state depending on the branch selected.
o Navigating into a branch is often referred to as 'checking out' a branch.
- Git Switch vs Git Checkout:
- Git Switch is a newer, more specialized command solely switches and creates branches
- Git Checkout is a versatile command that can also create and switch branches, but can also discard changes, restore files, and check out specific commits
- Users can also create and navigate into a new branch with the following command:
|
git
switch -c <new_branch_name> or git checkout -b <new_branch_name> |
- Rename a branch in a local repository by first navigating to the branch you want to rename, then:
|
git
branch -m <old_branch_name> <new_branch_name> |
- Delete a branch in a local repository by first navigating out of the branch being deleted (i.e. navigate into another branch that is not being deleted), then:
|
git
branch -d <branch_to_delete_name> |
o NOTE: The branch that is currently checked out cannot be deleted. Navigate into another branch that is not the one to be deleted first.
o NOTE: If a branch in a remote repository tracks the local branch that is being deleted, the remote branch must be deleted before the local branch is deleted.
- Push a branch created locally to a remote repository with the following command:
|
git
push -u <remote_server_alias> <branch_name> |
- Rename a branch in a remote repository:
- Navigate locally to the branch you want to rename
|
git
checkout <old_branch_name> |
- Rename the branch locally
|
git
branch -m <old_branch_name> <new_branch_name> |
NOTE: The branch is now renamed locally. No further steps needed for the local branch rename
- Push the renamed local branch to the remote repository
|
git
push -u <remote_server_alias> <new_branch_name> |
- Delete the remote branch with old name:
|
git
push <remote_server_alias> --delete <old_branch_name> |
NOTE: The renamed branch does NOT need to be deleted locally - the local branch is directly renamed. The renamed local branch that is pushed to the remote repository will completely replace the remote branch with the old name
- Delete a branch in a remote repository:
|
git push <remote_server_alias>
--delete <branch_to_delete_name> |
or
|
git push <remote_server_alias>
:<branch_to_delete_name> |
Merge Branches
· Changes made in one branch can be reflected in another branch with the 'merge' command, bridging a repository's forked history.

- Changes made in one branch (A) can be reflected in another branch (B) by merging branch (A) into branch (B) with the following command:
|
git
switch <branch_B> or git checkout <branch_B> |
|
git
merge -m "<meaningful_message_about_merge>"
<branch_A> |
o Branch (B) (target) will inherit changed features from branch (A) (source), making no changes to branch (A) and merging the repositories' forked history.
- This is useful when developing in production and development branches, where finalized development branch files can be merged with production branches files to reflect changes across both branches.
- Merge conflicts occur when both branches to merge contain different committed changes. An error indicates conflicts to resolve and the branch in which the merge failed (the currently checked out branch).
- Navigate into the file in the indicated branch that caused the filed merge via file viewing program (Notepad, etc.).
- A "HEAD" section in the file indicates the file's current state within that branch.
- The section below indicates the file's current state in the other branch.
- Delete the file content that you wish to remove, retaining only the content that you wish to commit in the merge
- NOTE: Delete unnecessary tags, characters, etc. (<, =, HEAD, UpdateText) associated with the text you are deleting before saving, closing, and attempting merge.
- Commit the change manually
- Merge a specific file that's committed to one branch into another branch with the following commands:
|
git checkout <destination_branch> |
|
git checkout <source_branch>
-- <file_name> |
|
git
add <file_name> |
|
git
commit -m "<meaningful_commit_message>" |
Rebase
<>
Setup Remote Repositories
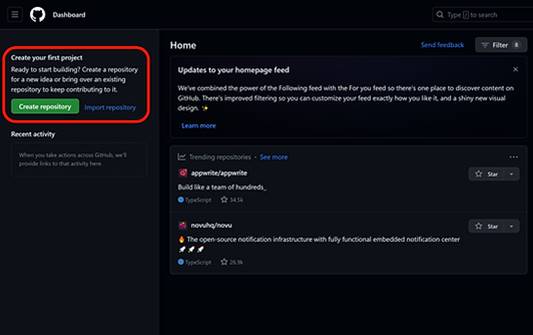
- Create the repository in your remote environment and configure repository settings as needed. This tutorial will implement GitHub.
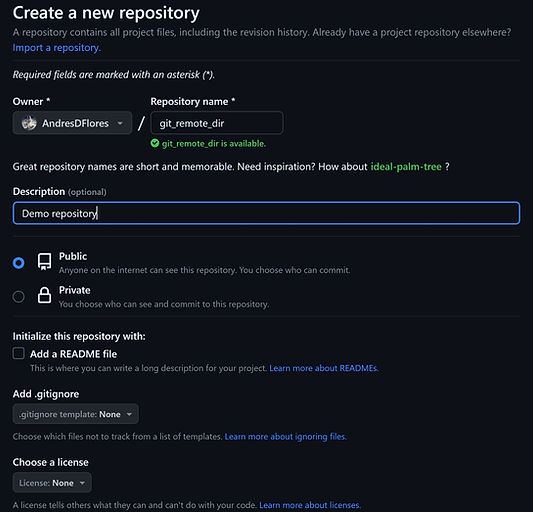
Create a New Repository from the Command Line
- Initialize a new repository with the following command:
|
git init |
- Create a README file with the following command:
|
git
add README.md |
- Commit the new README file to your new repository with the following command:
|
git
commit -m “<meaningful_message_about_commit>” |
- Navigate to the branch to push to the remote repository with the following command:
|
git
branch -M <branch_name> |
- Connect the local git directory to a GitHub repository with the following command:
|
git
remote add <remote_server_alias> <repository_url> |
o A Remote Server Alias can be thought of as a variable that contains the remote repository's URL so that you don't have to manually input it in commands thereafter
o A common server alias name is 'origin'
- Rename an existing remote server alias:
|
git
remote rename <old_remote_server_alias> <new_remote_server_alias> |
- Confirm access to remote repository through git with the following command:
|
git remote -v |
Push Existing Local Repository from the Command Line
- Connect the local git directory to a GitHub repository with the following command:
|
git
remote add <remote_server_alias> <remote_url> |
- Confirm access to remote repository through git with the following command:
|
git remote -v |
- Navigate to the branch to push to the remote repository with the following command:
|
git
branch -M <branch_name> |
- Push current committed file states from the local repository to the remote repository with the following command:
|
git
push -u <remote_server_alias> <branch_name> |
Pull Remote Repository's Current State Data Into Local Repository:
- 'Fetch' downloads the history from the remote tracking branches to the local tracking branches without impacting the local workspace (i.e. does not merge changes from the remote repository with the working local repository) with the following command:
|
git
fetch |
or
|
git
fetch <remote_server_alias> <branch_name> |
This allows you to view available changes without affecting your working directory
- After committing fetched changes to the local repository, fetched files from the remote repository can be synchronized with the local the working directory with a merge:
|
git
merge |
- Alternatively, 'Pull' synchronizes the local repository with the remote repository, prompting the local repository to update its filesystem based on the remote repository's current state.
- Download changes from the remote repository and merge them into the current local repository branch with the following command:
|
git
pull |
or
|
git
pull <remote_server_alias> <branch_name> |
o NOTE: 'Pull' cannot be performed if the user is actively editing any tracked files in the local workspace that conflicts with the remote repository's contents.
o NOTE: If tracked files are being edited while performing a 'pull', the 'pull' will fail and the remote repository files will, alternatively, be 'fetched'.
- Understand the difference between the 'fetch' and 'pull' commands:
Pull = Fetch + Merge
Fork vs Clone
- The difference between a fork and a clone lies in how much control a developer has over a repository.
- Project members can perform clone, edit, and push interactions with a main project repository. Cloning performs a repo-to-repo collaboration copy. Clone a repository with the following command:
|
git
clone <source_repository_url> |
- Alternatively, non-project members can clone and edit a repository, but change pushes are prohibited. Alternatively, they can fork the project repository and fully access and interact with the forked repository without impacting the original repository.
- This is especially useful for collaborating developers, where development work can be performed in a forked environment, then merged back into the main project with a pull request.
- 'Fork' is not accessible through the git bash terminal because it is a functionality unique to GitHub. A fork is created by clicking the fork icon in the top-right of the window when logged into a GitHub account.
Pull Requests
· Remote repositories are often collaborative spaces with multiple contributors. When a developer is ready merge new code changes with the main project branch, a pull request (also known as a merge request) is initiated to merge the developer's workspace with main. The steps below outline a standard pull request workflow.
- Create a fork of the main project repository in your GitHub account.
- The forked repository can also be cloned into your local repository.
- Now the developer obtains a fully accessible working copy of the main project.
- Any changes pushed to the forked repository will not impact the source main project repository
- Initialize a pull request from GitHub, prompting the main repository branch manager to review the changes before approving the merge.
- Once approved, the changes made in the forked repository will be reflected in the source main project repository.
Change the Remote Repository URL to which a Local
Repository is Linked
- Change the GitHub repository URL that the local repository connects to with the following command:
|
git
remote set-url <current_remote_server_alias>
<new_repositoru_url> |
Disconnect a Local Repository from GitHub/Remote
Repository
- Disconnect the local git repository from a GitHub repository with the following command:
|
git
remote remove <remote_server_alias> |
Delete the Local Git Repository
- Navigate to the repository's root branch and delete the local git repository with the following command:
|
git
-rf .git |
Personal Access Tokens
- Create a Personal Access Token in GitHub to automatically authenticate access without inputting username and password. Credentials can be managed here too.
- Implement your Personal Access Token with the following command:
- NOTE: <remote_server_alias> is ‘origin’ by default if you did not redefine it
|
git
remote set-url <remote_server_alias>
https://<personal_access_token>@github.com/<repo_owner_username>/<repository> |
- Remove your Personal Access Token with the following command:
|
git
config --global --unset credential.helper |
Helpful
Resources
- How to Generate a
Personal Access Token in GitHub
- Git and
GitHub for Beginners Tutorial - Kevin Stratvert
- Test your knowledge with Learn Git
Branching